%20crop.JPG)
"Fun" with JPEGs, RAW Images, Planetary Conjunctions, Geotagging and Free Software!
Andrew Johnson - ad.johnson@ntlworld.com
I took my first photographs in about 1972, when I was about 8 years old, using a mostly-plastic twin lens reflex camera. It used black and white roll film and had no flash - basically not much of anything.
Since that time, I've had a fair number of cameras - one of my favourites being the Canon EOS 1000FN - and I first used digital camera in 1995 or 1996 (a Casio QV10). I essentially stopped using film cameras in about 2004, when I had got hold of a 2 Megapixel Canon A40. As you will have deduced by now, I am just an interested amateur - I have never had professional film or video equipment nor have I ever taken any "award winning" photos.
One of the things I have been interested in, however, is taking "astronomical photos" - "astro photography". In the mid 1980's, I used go to the Coventry and Warwickshire Astronomical society meetings and there, we used to occasionally have very knowledgeable and fairly well-equipped amateurs - who understood the challenges presented by photographing the night sky using 35mm film. They were well versed in special developing techniques and problems such as "reciprocity failure". By the end of the 1990's, however, some truly revolutionary changes were taking place, with things like guided telescopes with "go to" features, and sensitive CCD-based equipment which could produce very high quality images in the hands of competent users. Though I was interested in such things, I never made the investment of time or money to buy my own equipment - partly because of the lack of clear, dark skies where I lived and partly because it gets cold at night!
In April 1997, I had just started to use the internet and we had the impressive apparition of Comet Hale Bopp (click here for a bit of a mystery about it - and follow it up - see where you end up). I took my own photos with a very cheap camera with a telephoto lens - and no special equipment other than a tripod!
In 2004, I had a 2 Megapixel Canon (mostly plastic) A60 and noticed (using "Redshift" - desktop planetarium software) that there would be an opportunity to photograph the Moon, Venus and Mercury in one field of view. Mercury is often difficult to pick out because, as it is close to the Sun, it always appears near the horizon, which, for many people, is often obscured by trees and buildings. Nevertheless, with this cheap digital camera, I set up my tripod and did a long exposure - 13 seconds - to capture the planets as "little points of light". The whole exercise took all of 20 mins (and I took several shots). Astrophotography need not be difficult, or expensive!
(Click image for full size version).
Mar 24, 2004 - Looking West from My Bedroom!
My very humble efforts even ended up being posted on NASA's "Spaceweather" site. (Although I have had quite a bit to say about NASA elsewhere!!)
So, recently (8 years later) in mid March 2012, I noticed that there would again be an interesting arrangement of stars and planets "on display" in our night sky - a few nights in a row. I was looking at a wonderful online planetarium at www.neave.com and saw what appeared to be an interesting arrangement of a crescent moon, Venus, Jupiter, Orion and the Pleiades.
(click image for full size image)
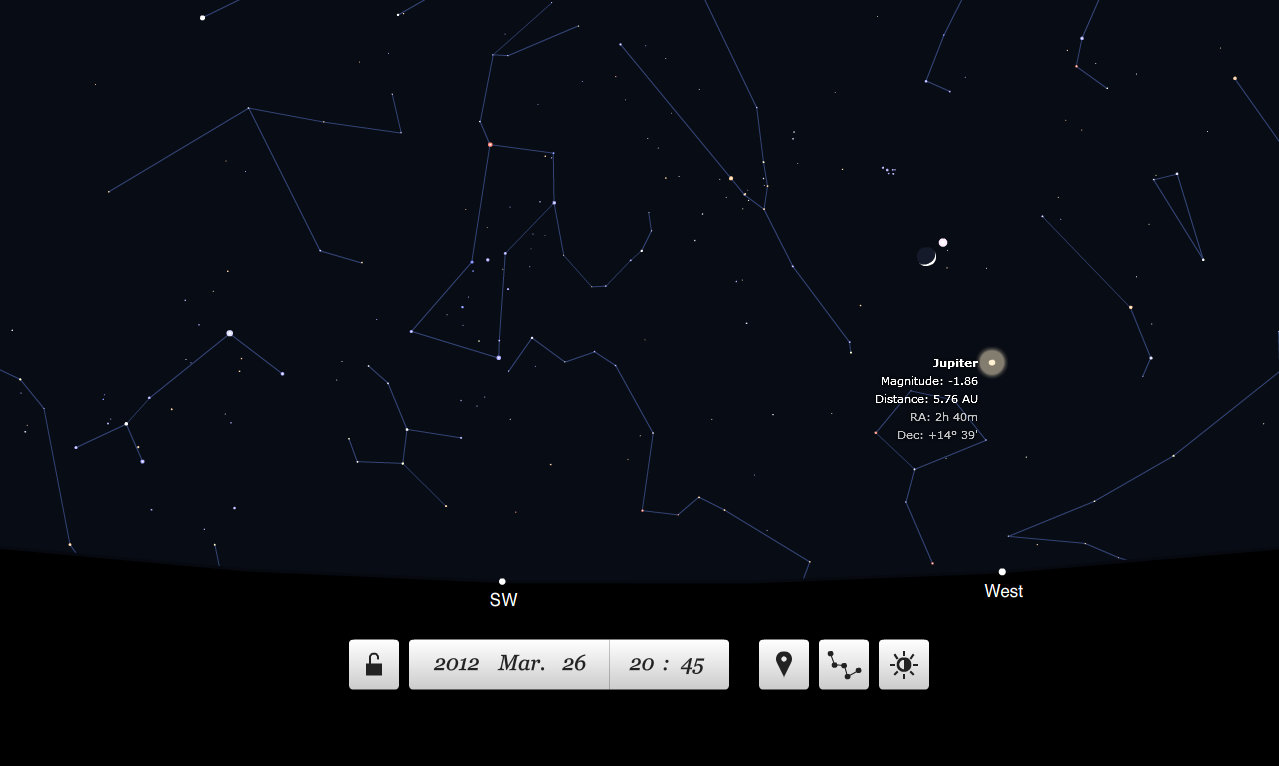
So, I wondered if the British Weather would "award" us a clear view of this spectacle... Over those few days, we had a run of good weather, so it was time to put my more modern camera through its "astrophotography paces".
In 2010, I had decided to invest in an advanced new camera - the Canon SX20 IS - again, this was an "amateur's camera" but it had all the features I liked, along with a fantastic and powerful zoom lens (actually just the thing you don't really need for good astrophotography!) Though these sorts of cameras can produce some truly fabulous daytime images, how would it fare in getting a photo like this - in the "dead of night"? The main reason why the SX20 - and similar cameras - are not that good for night sky photography is the maximum aperture - and "F-ratio". One of the basic features of a camera lens system is the maximum F-ratio - this is the ratio of the focal length of the lens to the diameter of the shutter when a photograph is taken. Simply speaking, the lower this number can be on a camera, the better it can take photographs in low-light conditions. For a "superzoom" camera, the SX20 actually has a fairly good F-ratio when taking "wide sky" shots with the "wide angle" setting of the lens (so that you get the widest field of view). The F-ratio is 2.8. A fancy SLR camera (digital SLR) with a specific type of lens may have an F-ratio of 1.4 - but you have to pay a lot of money for this!
To get a good image of the night sky you need at least the following things:
It is obviously the first 3 which are most within the photographer's control. Photographic film has what is known as an ISO Speed (or rating. Historically, this was known as "ASA" or a different scale that was used was "DIN"). The same type of rating has now been applied to Digital Cameras.
With film cameras, you specifically had to buy a more sensitive roll of film - such as 200, 400 or 1000 ASA (ISO). The 1000 ISO film used to be a bit more expensive, probably because not as many people used it (most commonly it was 100 or perhaps 200 ISO film that you would use). The way that film is made is that there are "light sensitive grains" - and these are of a certain size. If you have fewer grains, they react more quickly to light - allowing you to take photos in lower light. However, this means you have a "lower resolution" (lower quality) final image. Therefore, the lower your ISO rating, the better quality final image you will have - but the more light you will need to get good, clear images. In the 1980's, I used a roll of 1000 ASA film to try can get some snaps of Perseid Meteors (I only managed to capture one!).
On digital cameras, the ISO rating is normally just another setting in the menu - you don't need a special "memory card" or anything like that! This means you have an additional level of control over how the camera takes photos.
There is also one other factor to consider with digital cameras - which can potentially be more of an issue for dark sky photography - that is in-camera image processing and image compression. As many people will be aware, 24 bit colour images are most commonly stored in JPEG format which is a "lossy" format - to reduce the storage space taken up by an image, a complex process of "tiling" within the image is used to "throw image data away" and overall this reduces the storage size required. Different cameras allow different levels of control over the amount by which image is compressed - and some cameras will make a better job of the compression than others. Due to the reduction in quality that is caused (but can be difficult to perceive) with lossy compression formats like JPEG, more expensive digital cameras such as digital SLR's also allow images to be saved in an uncompressed or RAW format (there are several different formats - depending on the manufacturer). However, when transferring these images onto a computer, some knowledge is required to get the RAW image into a viewable/usable format.
Now back to my Canon SX20 camera... Though I had had the camera for 2 years, I had not realised that there were (essentially) "hidden features" - which, with some fiddling around, could be "unlocked". One of these hidden features is the ability to save an image in RAW format! This is especially useful for Astro images!
In a google search I was doing for a review of the latest camera, I came across something called "CHDK". This is something specifically for Canon Cameras. Basically, what you can do is load some extra software onto the camera's memory card and then it "overlays" an additional menu system onto the camera's main one! This opens up a whole new set of options - and I was able to "switch on" RAW image saving in my SX20 - a feature normally only available on more expensive digital SLR cameras!
So, back to 26 March - around 8:30pm, I just walked a few yards from by front door with my SX20 on a tripod. Pointing the camera to the South West Sky, it took me a few attempts to get the constellations all on the same photo! The stars don't really appear on the flip out screen and are hard to see in the viewfinder, bending down - so there's a little guess work. I made a couple of trips out when I realised my first images didn't have all the areas of interest in them.
The problem with a long exposure is that the camera needs to remain still for 10 seconds or more. If it wobbles as you press the button to take the picture (the "shutter release"), then your image will not be sharp. One solution with old 35mm SLR cameras and good quality compacts was a "cable release" where you could screw in a short cable with a plunger. It was much easier to press and hold the plunger to do a long exposure without your finger or arm getting tired - or wobbling the camera! Most cheap digital cameras don't have a cable release - nor an electronic equivalent (using the CHDK hack, it's possible to rig up an electronic switch/cable release through the camera's USB socket however).
The other solution is to use the camera's self-timer. You press the shutter release and then the photo will be taken a few seconds later. I used the 10-second timer.
Having grabbed a few images, I took them back to my PC to enlarge and scrutinise them.
First, it was easiest to look at the image the camera had saved in the normal JPEG format. It was actually fairly good:
%20(Custom).JPG)
As I had not remembered to set the image resolution on the camera correctly, this turned out to be a lower resolution image (about 3 MP rather than 12 MP that the camera is capable of), but it was still fairy good.
You can clearly see the main stars of Orion, the Pleiades and, of course, the Moon (very much overexposed - because it is very much brighter than the rest of the objects in the sky) and Venus and Jupiter. And what was that line heading towards the Pleiades? A UFO? A flying saucer? A shooting star? Nope - just an ordinary airplane - its appearance captured in a long exposure - with the flashing of its navigation lights. (I've never managed to photograph a flying saucer, though plenty of people have and plenty of people know a lot more about this than they are "telling you straight" - the available evidence proves this).
The Camera had done a fairly good job at producing a fairly good image - but it somehow seems a little "brown and dull". I was therefore not expecting a great deal from looking at and playing with the RAW image data. This was especially true seeing as it was not something I had ever tried before.
After some more googling, I found a freeware/open source RAW image handling program called UFRaw - an appropriate title considering my other research! This was an excellent program - fairly easy to use. I have some knowledge of some aspects of image manipulation and so made educated guesses about what settings to change (I should really try to learn more about this area, at some point, though). However, after a few minutes of playing, I was able to generate this image from the raw data:
.JPG)
Click Here for Larger Version!
I have to say I was very pleased to get this result! I took a few other shots and have put them here. Feel free to download the full image - see if you can make out the 7th star of the Pleiades (Seven Sisters). I can!
In the image above, I have made an image map, so you can hold your mouse over some of the main groups of stars to see what they are. Jupiter has almost set, being the orangey object near the bottom right (Jupiter is normally whitish/yellowish in appearance but here is seen through more of the atmosphere, so it's more orange/yellow in colour.
This brings me onto some other details about the image - it becomes clear that the stars are different colours. You can't really see this so much with the naked eye, but you can see this more with a good telescope or even good binoculars. In the above image, I tweaked it to have a black/bluish sky colour, which is not really how it looked to the naked eye on that night - however, as I was making this image, I liked that look better (and this is actually little different to what they do with many Hubble telescope images - in more than a few cases, the colours are not necessarily exactly as they would appear to the naked eye - some of the images are heavily processed).
If you view the full resolution version of the image, one detail that emerges is the different coloured navigation lights flashing on the plane. I was impressed that the camera's sensor was able to resolve these colours (even if they are not totally accurate because of the way I've tweaked the raw image).
One of the lesser known things about digital camera images - and one of advantage of the JPEG standard - is the inclusion of what is called EXIF information. When the camera takes a photograph, it records not only the image but data about the image (meta data). This includes the time and date the image was captured (if the camera's internal clock is set correctly), the make and model of camera, exposure time, F-stop setting, ISO setting and so on - there is actually quite a bit of information. Newer versions of Windows and other operating systems will even show you some of this data in the various folder views that you can set.
When images are saved in "RAW" format, however, the EXIF data is not saved. However, as I try to keep records of the dates and times of things now (more than I used to - as you get older, one year rolls into the next all too quickly!!), I wanted to somehow record the EXIF data for my RAW image. Also, I wanted to save out the RAW image in the highest quality JPEG possible. The UFRAW programme allows you to do this and results in a file roughly half the size of the original RAW image (about 8.5 MB) and it's difficult to notice the difference. However, this still meant I didn't have the EXIF info from the original image. And, with perhaps 50 or 100 pieces of data, I didn't want to re-enter it all manually...
I needed some good image editing software. Often, people reach for Adobe Photoshop (though there are many alternatives, of course). If you don't own photoshop and don't have the money to buy a copy, then you could download GIMP- which is opensource and free. This allows sophisticated image manipulation (and it can handle some RAW image formats, but UFRAW can do this more simply). So, what I did was I loaded the JPEG that the camera generated and then I resized the canvas for the image to the same size as the RAW image. I then loaded in the RAW image file and copied and pasted the whole image into the JPEG file, saving it as a new ("final") JPEG image - and GIMP preserves this information when the file is saved (some applications will not save the EXIF info).
Before I had saved the image in GIMP, to transfer the EXIF data from one file to another, I wondered if there was another program which could do this. In Google searches, a program called GeoSetter came up - which seemed to enable you to copy EXIF information from one file and save it into another. However, this programme does quite a bit more than that - as its name implies, its main job is to handle "geotagging" information within the EXIF file. A newer Sony Camera that I have (which cannot save images in RAW format) has a GPS receiver in it. Once it has been in view of GPS satellites for long enough, it will then add in location information into the EXIF data of any JPEG files it saves. Within the GeoSetter program, you can locate on a map where all the images were taken. Additionally, the camera has a digital compass... why? So that you know which way the camera was facing when the image was taken! Geosetter then uses this information to show you the direction that the image was taken in, and it can even indicate the viewing angle of the image! (Click for larger version).
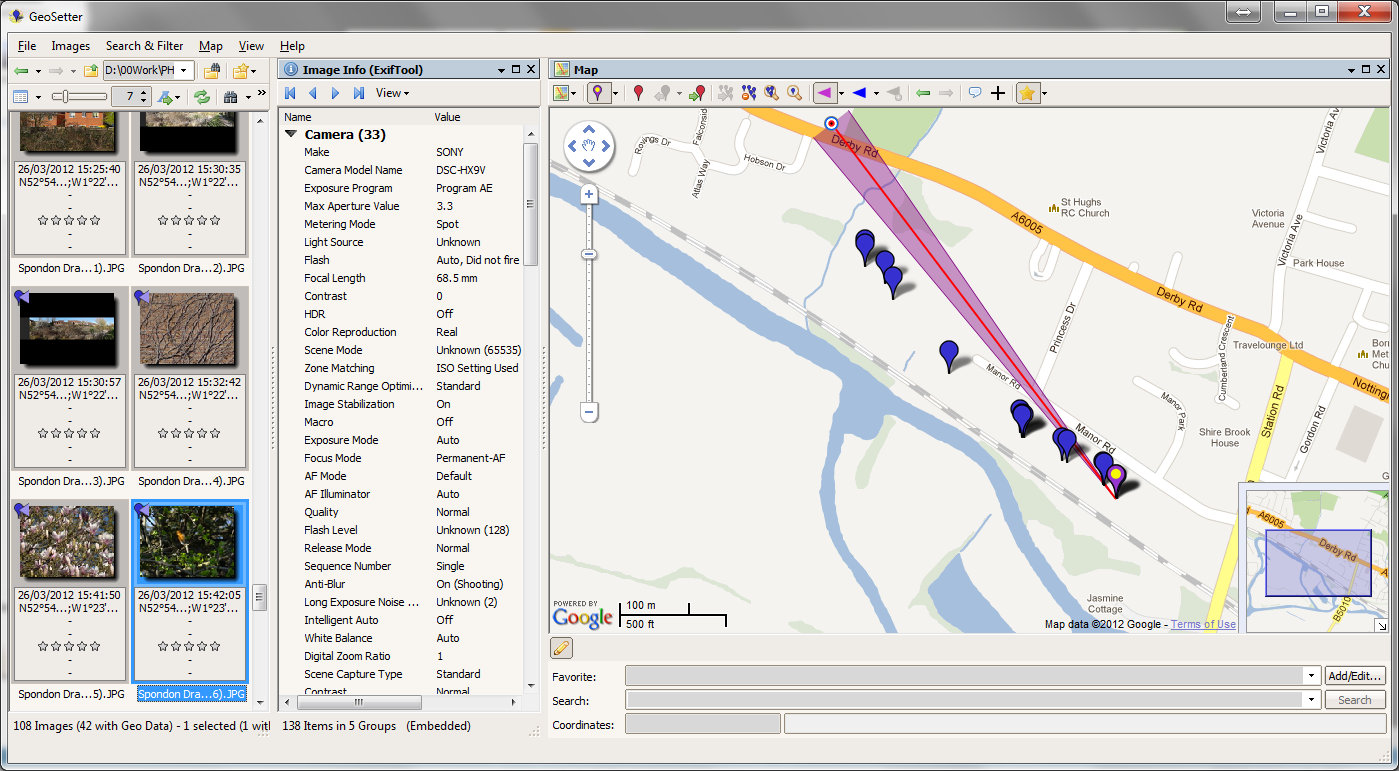
When I found this, I thought I would add one final touch to my Astro Image - the location data. The canon SX20 does not have a GPS receiver or digital compass. However, the Geosetter program allows map co-ordinates to be written in to EXIF data simply by clicking the image and then clicking on the map (you can also set the direction of view).

You certainly don't have to go to the lengths I went to get some interesting night sky images - but I hope that this write-up has been of some interest and that, above all, you can get an idea of the sort of night sky image you can get with a digital camera. Even a cheap camera can be used - as long as it allows you to have longer exposures of about 8 seconds or more. If you don't have a tripod, you could even just lay it on the ground and point it at the sky! (Set the self-timer though). Why not try the automatic mode? Any "duds" can just be deleted! It's not like the days of film - where you had to pay for the cost of the film itself, developing the film and making the prints! Go on - have a go!For further information about this have a look at a Quick Start Guide to Beginning Digital Astrophotography.